 Backing Up Files
Dell™ PowerEdge™ 2550 Systems Installation and Troubleshooting Guide
Checking Connections and Switches
If your system is not working as expected, begin troubleshooting using the following procedures. They will guide you through some initial checks and procedures that can solve basic system problems. These procedures can also direct you to more detailed troubleshooting information and procedures to solve more complex problems.
 |
NOTE: When you see the question "Is the problem resolved?" in a troubleshooting procedure, perform the operation that caused the problem. |
If the system is behaving erratically, back up the files on the hard-disk drives immediately. See the documentation that came with the operating system for instructions on how to back up the files.
The following procedure leads you through the checks necessary to solve some basic system problems:
Yes. See the information on alert log messages in your server management documentation.
No. Go to step 2.
Yes. Go to "Checking Inside the System."
No. Go to step 3.
Is the problem resolved?
Yes. The power to the system was faulty, or the connections to the system were loose. You have fixed the problem.
No. Go to step 4.
Did the system complete the boot routine?
Yes. Go to step 5.
No. A serious malfunction may have occurred. Go to "Getting Help."
Yes. Go to "Messages and Codes."
No. Go to step 6.
Is the problem resolved?
Yes. The system configuration information was incorrect. You have fixed the problem.
No. Go to step 7.
Improperly set switches and controls and loose or improperly connected cables are the most likely source of problems for the system, monitor, or other peripherals (such as a printer, keyboard, mouse, or other external equipment). A quick check of all the switches, controls, and cable connections can easily solve these problems.
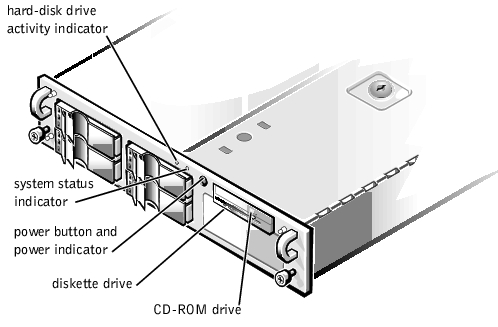
Figure 2-1 shows the back-panel connections on the system. Figure 2-2 shows the front-panel controls and indicators on the system.
Figure 2-1. Back-Panel Features
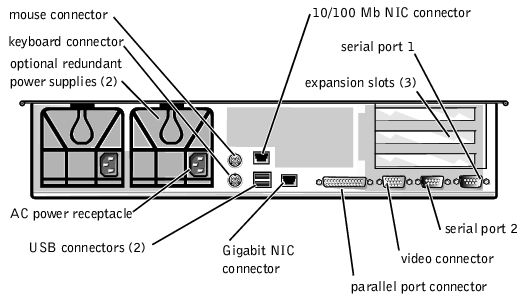
Figure 2-2. Front-Panel Features
To check all connections and switches, perform the following steps:
Is the power strip receiving power?
Yes. Go to step 5.
No. Go to step 3.
Is the power strip receiving power?
Yes. The original electrical outlet probably does not function. Use a different electrical outlet.
No. Go to step 4.
Does the system receive power?
Yes. The power strip is probably not functioning properly. Use another power strip.
No. Go to step 5.
Is the problem resolved?
Yes. The connections were loose. You have fixed the problem.
No. Go to step 7.
Yes. Go to step 8.
No. Go to "Troubleshooting the Monitor" in "Checking the Equipment."
Yes. Go to step 9.
No. Go to "Troubleshooting the Keyboard" in "Checking the Equipment."
Yes. See "Look and Listen."
No. Go to "Troubleshooting the Basic I/O Functions" in "Checking the Equipment."
Looking at and listening to the system is important in determining the source of a problem. Look and listen for the indications described in Table 2-1 .
Table 2-1. Boot Routine Indications
|
Look/Listen For |
Action |
|---|---|
|
An error message |
See "Messages and Codes." |
|
Alert messages from the server management software |
See the information on alert log messages in your server management documentation. |
|
The monitor's power indicator |
Most monitors have a power indicator (usually on the front bezel). If the monitor's power indicator does not come on, see "Troubleshooting the Monitor" in "Checking the Equipment." |
|
The keyboard indicators |
Most keyboards have one or more indicators (usually in the upper-right corner). Press the <Num Lock> key, the <Caps Lock> key, or the <Scroll Lock> key to toggle their respective keyboard indicators on and off. If the indicators do not light up, see "Troubleshooting the Keyboard" in "Checking the Equipment." |
|
The diskette-drive access indicator |
The diskette-drive access indicator should quickly flash on and off when you access data on the diskette drive. If the diskette-drive access indicator does not light up, see "Troubleshooting the Diskette Drive Subsystem" in "Checking Inside the System." |
|
The hard-disk drive activity indicators |
The hard-disk drive activity indicators should quickly flash on and off when you access data on the hard-disk drives. On a system running the Microsoft® Windows NT® operating system, you can test the drive by opening Windows® Explorer and clicking the icon for drive C. If the hard-disk drive access indicator does not come on, see "Troubleshooting SCSI Hard-Disk Drives" in "Checking Inside the System." |
|
A series of beeps |
See "System Beep Codes" in "Messages and Codes." |
|
NOTE: For the full name of an abbreviation or acronym used in this table, see "Abbreviations and Acronyms." |
|
You can easily correct certain system problems by verifying the correct settings in the System Setup program. When you boot the system, the system checks the system configuration information and compares it with the current hardware configuration. If the system hardware configuration does not match the information recorded by the System Setup program, an error message may appear on the screen.
This problem can happen if you changed the system's hardware configuration and forgot to run the System Setup program. To correct this problem, enter the System Setup program, correct the corresponding System Setup setting, and reboot the system. See "Using the System Setup Program" in the User's Guide for detailed instructions on using the System Setup program.