Manuals

Manuals
Expansion-Card Cage (Small Desktop Computer Only): Dell OptiPlex GX50 Systems

Back to Contents Page

Expansion-Card Cage (Small Desktop Computer Only)

Dell™ OptiPlex™ GX50 Systems

  Removing the Expansion-Card Cage

  Replacing the Expansion-Card Cage

  Removing the PCI Riser Board

  Replacing the PCI Riser Board


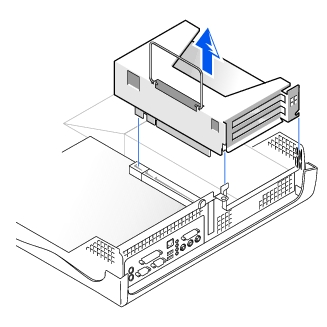
Removing the Expansion-Card Cage

CAUTION: Use a wrist-grounding strap as explained in "Precautionary Measures."
  1. Examine any cables connected to expansion cards through the back- panel openings, and disconnect any cables that will not extend to where the cage must be placed when it is removed from the computer.

  2. Remove any cables connected to the expansion card.

  3. Gently pull on the handle and lift the expansion-card cage up and away from the computer.

Removing the Expansion-Card Cage


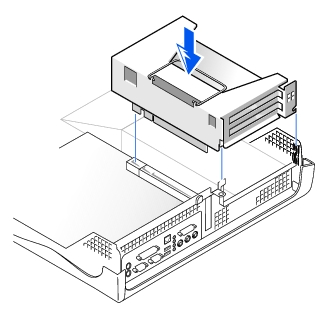
Replacing the Expansion-Card Cage

  1. Align the expansion-card cage slots with the tabs in the computer opening for the expansion-card cage. Slide the expansion-card cage into place.

  2. Make sure that the riser board is fully seated in the RISER connector on the system board.

Replacing the Expansion-Card Cage

  1. Reconnect any cables you removed in steps 1 and 2 of the previous procedure.


Removing the PCI Riser Board

NOTICE: To avoid damage to the expansion cards or the system board by ESD, ground yourself by touching an unpainted metal surface on the back of the computer.
CAUTION: Use a wrist grounding strap as explained in "Precautionary Measures."
  1. Remove the expansion-card cage.

  2. Remove the expansion cards installed in the slots.

  3. Remove the two screws that attach the riser board to the expansion- card cage.


Replacing the PCI Riser Board

Follow the "Removing the PCI Riser Board" procedures in reverse order.


Back to Contents Page


Copyright 1999-2007 Dell Inc.
Battery Recall | About Dell | Conditions of Sale & Site Terms | Unresolved Issues | NEW Privacy Policy | Contact Us | Site Map | Feedback

Top
Large Text
sn AP28