|
I/O Panel: Dell OptiPlex GX50 Systems
Back to Contents Page
Dell™ OptiPlex™ GX50 Systems
 Removing the I/O Panel Removing the I/O Panel
Replacing the I/O Panel
- To access the screw that holds the I/O panel to the
computer, remove the hard drive.
I/O Panel Removal—Small Form-Factor Computer
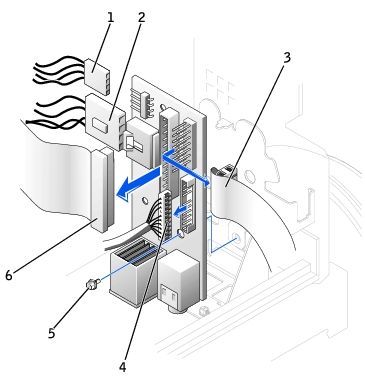
| 1 |
Internal speaker cable |
| 2 |
Chassis intrusion switch cable |
| 3 |
Control-panel cable |
| 4 |
Front audio cable |
| 5 |
Mounting screw |
| 6 |
I/O cable |
- Disconnect the control-panel cable from the
control-panel connector on the I/O panel. Disconnect the I/O cable from the I/O panel.
- Remove all cables that are connected to the I/O panel,
such as the chassis intrusion switch and internal speaker cables.
- From inside the computer cover, remove the mounting
screw that secures the I/O panel to the computer.
- Remove the I/O panel from the computer.
- Remove the hard-drive
shroud.
- Disconnect the hard-drive data cable.
- Disconnect the control-panel cable from the
control-panel connector on the I/O panel. Disconnect the I/O cable from the I/O panel.
Note the routing of the control-panel cable as you remove it from the
computer so that you can replace it correctly.
I/O Panel Removal—Small Desktop Computer
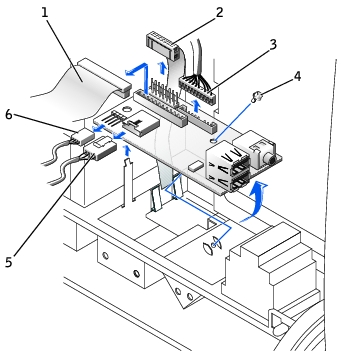
| 1 |
I/O cable |
| 2 |
Control-panel cable |
| 3 |
Front audio cable |
| 4 |
Mounting screw |
| 5 |
Chassis intrusion switch cable |
| 6 |
Internal speaker cable |
- Remove all cables that are connected to the I/O panel,
such as the chassis intrusion switch and internal speaker cables.
- Remove the mounting screw that secures the I/O panel to
the computer.
- Remove the I/O panel from the computer.
I/O Panel Removal—Small Mini-Tower Computer
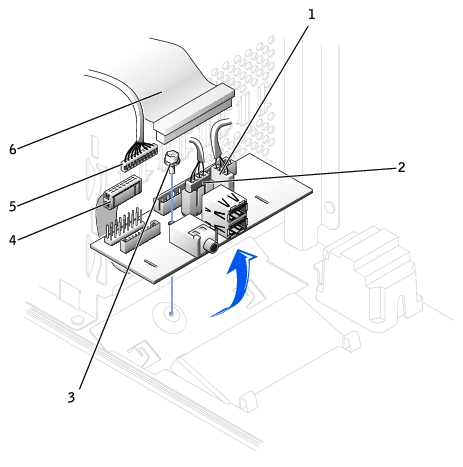
| 1 |
Internal speaker cable |
| 2 |
Chassis intrusion switch cable |
| 3 |
Mounting screw |
| 4 |
Control-panel cable |
| 5 |
Front audio cable |
| 6 |
I/O cable |
- Disconnect the control-panel cable from the
control-panel connector on the I/O panel. Disconnect the I/O cable from the I/O panel.
Note the routing of the control-panel cable as you remove it from the
computer so that you can replace it correctly.
- Remove all cables that are connected to the I/O panel,
such as the chassis intrusion switch and internal speaker cables.
- From inside the chassis cover, remove the mounting screw
that secures the I/O panel to the chassis.
- Remove the I/O panel from the chassis.
To replace the I/O panel, follow the removal procedures in reverse.
Back to Contents Page
| 

